Friday, November 21, 2014

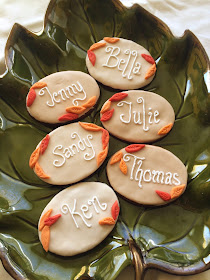
Thanksgiving Cookie Place Cards

Before I show my Thanksgiving Cookie Place Cards, I have to share this yummy recipe I found! It was my Mum's birthday last week and all she asked for was a carrot cake. A carrot cake for Mum? Well I had to find the very best one. I found this delicious recipe at Gimme Some Oven. Fresh grated carrots, roasted black walnuts and raisins that have been plumped.


It was such a delicious three layer cake! So beautiful - it was a perfect, autumnal birthday cake. I quickly made a little banner with some beautiful Fancy Pants Design paper to add just an extra touch of love. What is your favorite carrot cake recipe?

This week I really wanted to try making marshmallow fondant. I found a great recipe at Moms & Munchkins. Tackle this baby at least 1 day in advance before you want to use it - I found day 2 was a smashing success! And be prepared that this is a messy endeavor.. have a couple dish clothes at the ready.

Thanksgiving Cookie Place Cards - Items Needed
Batch of baked and cooled cookies
Batch of marshmallow fondant
Corn syrup
Royal icing frosting - piping consistency (frosting bag, coupler and size 2 tip)
Red and orange gel food coloring
toothpicks

Start out with some freshly baked cookies - any type of sugar cookie will do. I like chocolate because I think it adds some flavor dimension. I also used an oval shape - you could use anything (square, circle, turkey, etc.) You will want something that is large enough to frost a name on to.

Roll out your marshmallow fondant thinly - about 1/8" thick and cut with the same cookie cutter used earlier. You need an edible adhesive to put on the cookie to stick to the fondant. You could thinly paint corn syrup, any type of frosting or ganache. I happened to have chocolate ganache in my fridge and used that. Then layer the fondant down on top. Smooth out the sides of the fondant, pushing it on to the cookie.

Mix a small amount of fondant with orange dye and another small amount with red. Roll into a boll and smush until it is consistently colored, unless you prefer a marbled look. With a sharp knife or toothpick, cut out the shape of the leaves and carefully create a vein through the center of the leaf.

Adhere the fondant leaves to the cookies by placing a small amount of corn syrup painted on the back of the leaf.


Prepare your frosting bag with coupler and size 2 tip. Carefully write each guest's name on the cookies with royal icing and allow to dry.

These cookies do not need to be refrigerated and can be done a few days in advance. Just keep them covered in a cool, dark spot of the kitchen.


Such a fun and yummy way to set the Thanksgiving table! You can also get the younger ones involved with this. Fondant decorations can be made in advance. Simply set up a cookie station with corn syrup, new paint brushes (to be used with food only), and frosting. While you work on the the turkey and stuffing, your kids will have the best time creating these.

Monday, November 10, 2014

Turkey Treats


I pinned this treat tutorial from Candiquick almost a year ago. It has been repinned thousands of times! I figured with all this excitement over the super cute treat, I should finally try to make my own.

This last week while I was on a rare grocery trip all by myself, you know - a mother's vacation, I found these s'mores flavored candy corns. How perfect are the colors? So autumnal and just crying to be turkey feathers.


What Did I Use:
Oreos
Chocolate candy wafers
Pretzel rods
Wilton toffee crunchies
S'mores flavored candy corn
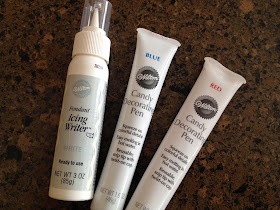
White fondant writer
Blue and red candy pens

I pulled out what remaining Oreo's I had in the cupboard and grabbed some dark chocolate candy wafers. Now, candy wafers are NOT chocolate. They look like it and taste pretty good, but no, not chocolate. If you really want to dip anything in chocolate, it must be tempered and that's a bit trickier. 

When I melt candy wafers, I do it on the stove on the lowest setting. Being patient in this game will pay off dividends! If you try to speed up the process by using medium or heaven forbid, high heat - you run the risk of burning or seizing the candy. This will make it completely icky. Be patient, take it slow - gently swirl the candy wafers around until they are completely melted. It should flow nice and be easy to dunk the cookies in.

Place your pot of melted candy wafers on a hot pad and near your working station. Dunk the cookies in one at a time. When it is completely covered, use a fork or candy dipping tool to rescue your cookie. Swirl it around above the bowl and let the extra candy slide off.


Place your assembly line of candy covered Oreo's on some wax paper to dry. If they are not smooth as glass, that's completely fine - you will have so much layered on top that it won't matter.


It will take awhile for the candy chocolate to dry. Pull out your bag of candy corn and place them on the Oreos to be the feathers. This part is so easy your kids can do it.. in fact, mine did!


Once the "feathers" are on, set them aside and let them completely harden. 

For the next step you will need the long, pretzel rods and some small sprinkles for the bottom of the turkey. I had some fun Wilton Toffee Crunchies on hand, but you could use sprinkles for a cute colorful look.


You will also need a few more candy corns. Just chop off the beautiful orange-yellow bits to become the turkey's beak.


Heat some more candy wafers up just like before - nice and slow! Dip a pretezel about 1/3 to 1/2 of the way. Swirl over the bowl and gently place on top of the Oreo.

Give the candy chocolate just a second to set up, but not harden completely. Then carefully center the candy corn beak on top.

Sprinkle some toffee crunchies or sprinkles on the bottom of the pretzel.
To finish the turkey face, I used a fondant writer and candy pens. You can find these in the baking area of most craft stores. You can also use melted candy wafers or royal icing.

Two medium squirts of white for the eyes, two small squirts of blue for the pupil and a little dash of red for the gobbler.
Let it set and completely harden. My husband didn't think the pretzel could hold the weight of the Oreo and candy, but we had no issues later that night or the next day. These would be so fun to have at the kid's table on Thanksgiving, for a class party or just that special turkey in your life!


Sunday, November 9, 2014

Macaron Mania

For the longest time, I planned on becoming a pastry chef. I worked in a French bakery during my undergraduate degree and moved to an apartment in Scottsdale, AZ right across from the culinary institute. Honestly I can't remember why I changed my mind. There is so much about baking and cooking that makes my heart flutter. It truly is a delightful mix of science and art. Alas, I didn't not pursue my culinary dream, but I do enjoy the time to play with it. I love the idea of mastering the more difficult delicacies like French macarons. They are light and melt in your mouth with such pleasure. You can change the flavors quite easily and they look so decadent. 


I have not mastered them, not even close. But I am having fun while I experiment. You absolutely do need a a super large round tip. On my first attempt all I had was a star tip. Those pumpkin spice meringue cookies were delicious, but hardly macaroons. I immediately bought a new tip and scoured Pinterest for some technique assistance.


And then I made these bits of heaven using the recipe from Delicious Everyday.

There are some incredibly great tips at Not So Humble Pie. Are they difficult to create? Yes, Ma'am. Are they impossible? No, of course not. And even the ones that look awful will taste divine -- my kids are pretty happy scampering off with one or two duds to enjoy. Maybe try making a few for the holidays this year!

Wednesday, November 5, 2014

Thanksgiving Turkey Legs - Sugar Cookies


all things belle - sugar cookie art - thanksgiving turkey legs

It's been a few years since I've enjoyed cookie art. I've had such a desire to paint lately and figured that with the holidays coming that I would put it to an edible use. These are so fun - my kids were going nuts as I made them. And children are exactly who I had in mind for these - a yummy treat during the Thanksgiving season.


For these cookies, I used Sweetopia's Chocolate Sugar Cookie recipe. It is incredibly delicious - an amazing chocolate flavor and smooth cookie bite. This recipe does make quite a bit of cookies, so be prepared for a full bowl of dough.

The cookie cutter for the turkey legs is actually a hot air balloon! I love cutters that can be used in various ways. My friends and I actually came up with quite a long list of what this cutter could be used as.


Now that I have 3 crazy kids corralling me while I'm in the kitchen, I have to be as efficient as possible. Here are my tools ready to go and this is what you will need:

*hot air balloon cookie cutter
*royal icing
*2 icing bags with couplers and size 2 round tips
*2 squeeze bottles
*brown sanding sugar
*2 disposable cups
*spray bottle
*brown icing color


I love this royal icing recipe from Cake Central. It was the perfect amount for these 4 large cookies with a bit left over.


After the frosting is made, I move a small bit into a disposable cup. I tinted it with the tiniest bit of brown to create a nice taupe, bone color. I learned this fabulous trick on Sweet Sugar Belle about placing the frosting in some plastic wrap and placing it all in the icing bag - you have to go check this out. It has changed my life!


After outlining the turkey meat and bone.


Once the outlining is done, it's time to create the flood icing. I spritz the the icing until it has a nice fluid consistency, like syrup, and place into the squeeze bottles. My cups are cracked here because I smash the sides together while pouring the icing out - makes it nice and easy to clean up!


Flood the bone with icing and allow it to dry. I use a long skewer to help gently push the icing around and pop any bubbles that arise.


Then flood the turkey meat area and sprinkle a bit of brown sanding sugar on top.


I guarantee you that these will be a hit! Silly and delicious - just as a sugar cookie should be..

Tuesday, November 4, 2014

Nightmare Before Christmas - Sally Costume

I have loved everything that Tim Burton has created. This year I decided I would finally be Sally from "The Nightmare Before Christmas". My husband was not into dressing up this year -- I can only convince him to wear a costume about every other year. My poor son was young enough that I could choose his costume and so he was Jack.

Now given that this costume was only going to be used for a handful of parties and probably never again, I did not want to spend a lot of money on it. I used the cheapest white broadcloth that I had yardage of in the closet (a horrible fabric purchase years ago that has been quite helpful!). I cut a general rag doll shape and sewed it up. It originally had sleeves, but those became too cumbersome and so I snipped them right off. Sewing is not scary, it's not surgery. It's fabric and thread and meant to be fun. If you have never sewn clothing before, I think this is the best time to do it. 


And then I dyed my hair fire engine red... I actually loved it so much that it is still this red today..


And then I painted and painted and painted. I scoured images of Sally off the internet and tried to emulate her dress. I used cheap, old craft paint. I did not mix in any fabric medium - this made the dress quite stiff and cartoon-like.. which was my goal.


Once the dress was completed, I returned to scouring the internet for makeup ideas.. My baby would have nothing to do with me the first time around. He cried, hollered and ran away from me. Maybe it was the eyes??


After the first party, I learned a few things and tried it a bit different.

I bought a couple pairs of light blue pantyhose to accessorize the outfit. I used one pair as pantyhose and added some Sharpie stitches. For the other pair, I cut out the panty area and wore it as a top under my dress. It gave me quick, blue Sally arms and kept help keep me warm.


Such a fun costume to wear! And now that we are in the first week of November, it's time to start planning next year's fun.. thinking Lucy & Ricky Ricardo!

Monday, November 3, 2014

Halloween 2014!

I hope everyone had a yummy Halloween! We celebrated the whole month of October. I honestly don't remember another year when we had quite so much going on. There were parties at Liberty Girls, co-ops, Girl Scouts, pre-school and trunk-or-treats. We had field trips to the pumpkin patch, to the farm and CornBelly's. We had multiple sessions of cookie decorating, decoration making and "Boo"ing the neighbors. I am a die-hard Halloween fan, but honestly by the time the date actually rolled around, I was pretty tired.

We celebrated with chili and cornbread (a family tradition!) and my Mum heard about this yummy candy corn colored drink. I know she heard the recipe on a local news show, but I can not find the blogger. This one over at DessertNowDinnerLater is very close to how she created it. The kids went bananas!


And no one wanted to pose for cute pictures. Seriously! That's what this holiday is about - lots of pictures! Neither of my girls ended up dressing like Elsa or Anna. My Kiddo was a sweet Cinderella, Wild Child was Ariel and Little Man was Jack Skellington. I didn't sew any of their costumes. I accept no guilt! Maybe next year I will make them, but this year we let Costco take care of it and had fun spending time together.


But I did sew one costume... I'm a huge fan of Tim Burton and when I saw Little Man's skelly costume, I knew I had to be Sally. 
I'm a bit tired of all the shenanigans in this picture! I will post more in depth pictures of how I created my costume later this week.

Here is the motley crew after trick-or-treating. Oi! This has been a crazy sugar crashing week.. Time to raid the loot and munch on some chocolate!

Thursday, October 16, 2014

Howlin' With The Angels


I can't even begin to tell you how bummed I am to miss this amazing fundraiser! Angel's Hands Foundation and Children & The Earth have created an amazing night - costumes, gambling, dancing and an auction. Really?! Just such a fun event for only $50. An unforgettable night while helping children in need- no brainer, right? You can purchase tickets at Children & The Earth.

I have donated a large art quilt for the auction. Although I almost never list my quilts for sale these days, I do enjoy sharing my work for charity. I hope if you go you will consider bidding on one of the auction items!

There are only a few more tickets available and you will be howling if you don't go!

Wednesday, October 15, 2014

Impermanent Art - Nail Art

I've always loved the idea of impermanent art. To create for the sheer joy of the process - not for a profit or lasting fame. To create something to bring inspiration for others or yourself. An art piece that you could walk away from tomorrow, full from the experience. I saw these manifestations in sidewalk chalk art, sand art and others. I've never found a medium that really worked for me nor the time to flesh out ideas.

And then I was blessed with two little girls. Two little girly girls. Two little girly girls that would have their toes and fingernails painted every day if they could. I have never been a nail girl. They chip, it's tricky - what artist does their nails? You know they will be trashed quickly. I found out though that painting little girls nails is a tricky way to make them extremely happy and they have to sit for awhile quietly as their nails dry. At some I figured that I should join in on the fun.. and then it was really fun. I searched Pinterest for ideas and holy moly, there are a ton! And it dawned on me that nail art can be impermanent art. I'm hooked.

I am not a good manicurist.. at all. I don't know what to do with my cuticles. I don't have a bunch of lotions and potions. I do however have a selection of nail paints, acrylic paints and lots of fine brushes.

So please excuse what is probably a tragic manicure and I hope you enjoy the latest nail art I've created for myself and one for the girls..