Sunday, May 31, 2015

Cactus - Cake Bites!


Cactus are so hot right now! I lived in Arizona for over a decade and I hated them. I moved there from the California coast at 16 - right in the middle of my high school years. I hated everything about our new home, as many teenagers would after a move. But in time I grew to love the desert. I love the monsoon season, I love the color contrast and I love the complete quiet that can be found. My husband is a desert man and I know he misses it. Lately with the cactus craze, I've been painting more cacti and the other day I had an idea to make a cactus cake bite. Now you can too!

What you will need:
1 package of the super mini cake cones
1 package of any shade of cocoa candy melts (or you could temper chocolate)
1 package of mini marshmallows
1 package of graham crackers
1 package of Oreo - S'mores (though you could use any flavor - I just thought this went the best with the other flavors)
1 package of vanilla frosting (again, you could use any flavor)
1 package of green candy melts
assorted sprinkles, sanding sugar


I love these super mini cake cones - I keep finding new ways to use them. They are the perfect base for cake bites.

Slowly melt your cocoa candy melts. The bags give directions on how to melt in the microwave, but I adore my double boiler. Either way, once they are melted you will want to dip each cone in the chocolate and set to the side to harden. Don't fuss too much about any imperfections; they are to imitate pots and rarely those are perfect.


I let mine sit over night and work on them the next morning. With a sharp paring knife, you can trim down the base to help it sit right. You can also shave any really big areas of too much chocolate. Save the extra bits of chocolate - you will need them in just a minute.


Stuff mini marshmallows down into the pot. This will help weight it and allow it to sit. It's also a yummy surprise once the cake bite has been devoured.

*You could also use gummi bears or any other favorite small candy.

Melt the extra chocolate candy wafers and cover the pot tops. Before it hardens, sprinkle crushed graham cracker on top. This will be the gravel or soil.


Drop all the Oreo crackers into a Cuisinart and blend until they are all crumbled up. Since it has the creamy filling, they will be slightly moist. Now you will add a dollop or two of the vanilla frosting. You want just enough frosting that the Oreo mixture will stick together like clay, but you do not want it too sticky!


There isn't a perfect amount of frosting - it depends on how many cookies you start with, the weather, etc.. I would start with a couple big spoonfuls and blend. Check until it's the desired consistency.


Shape the Oreo cake dough into the desired cactus shapes. Check out pictures of the real plant, look at clipart, and other cactus art. Try to vary the shape - you may find some are easier to work with than others. And then place in the fridge for 20-40 minutes (do not place in freezer!)

*When you are shaping the cake bite, gently test it on the pot to see if it is a good proportion.


While your cake pops are hardening in the fridge, place a toothpick in the center of each pot. Be sure to let the cake pop eaters know about this so they don't get an unpleasant surprise.


Melt the green candy to coat the cactus. I found a really fun bright green at Michael's - it's Wilton's Vibrant Green.


Get your decorating yummies out and ready to use. I picked out green sprinkles, green sanding sugar and a few other goodies. Explore your nearest baking supply store for things that maybe fun to use.


Then you will dip and decorate your cactus. I placed mine to the side to harden and then placed gently on the toothpick center of the pot.


I think these would be so fun for any desert or Mexico themed party. Wouldn't these be adorable table favors at a wedding or fiesta? Your guests will love that their personal cactus is completely edible and delicious!

Friday, May 29, 2015

For the Love of Baking

I love to bake. I would bake all day, every day if I could. I don't love having sweets at home every day though. My toddler knows where fresh baked cookies cool and he stands in front of the shelf, pointing and begging. Sigh. So I love it when I have a reason to bake for OTHER people and we can keep just a couple as a treat.

These were a batch for a good friend that is expecting her baby girl any day now!

And these vanilla swirl cones were packaged off to a friend that is holding a cancer treatment fundraiser.

Mmm.. Have you been baking lately?

Thursday, May 21, 2015

Auction for Nepal.

In light of the devastation in Nepal from the destructive earthquakes, I have set up an auction on Ebay for this mixed media art piece. According to UNICEF, right now in Nepal there are 12 babies born every hour without basic healthcare. This means that 18,000 newborns and mothers will be at mortal risk over the next couple of months. As a mother, this is devastating and I want to do something.

Please consider bidding on this art piece or sharing the information with someone that may be interested. Every single dollar with be donated to UNICEF. Together we can help make a difference.

The skull pattern was generously donated by The Quilted Fish. If you would like to purchase it, please click here for more information.

XO

Tuesday, May 19, 2015

Cheeky Popsicle Cookie Pops


My second daughter is finishing up her last year of preschool at a traditional school - in a few months, I will be homeschooling her as well. As excited as we are to have all our babies at home, we will truly miss this preschool and everyone there! She's made so many friends that we will be keeping in touch with for play-dates. I wanted to make those cutie pies a small end-of-the year treat for them on their last day.

I searched high and low on Pinterest for end of the school year cookie ideas, but just didn't find any that knocked me out. Originally I was going to do a beach ball - for "Have a ball this summer!", but I wasn't hooked on it. I started to see a lot of Popsicle cookies on my Instagram feed and thought that would be fun. I added my own little spin and made them Kawaii Popsicles. I'll be adding a little watercolor tag on them - "Stay Cool This Summer!"
For these cookies, I used my cookie artist idol, Arty Mcgoo's Roll-Out Cookie recipe.  When I roll out cookies, I always roll between two sheets of parchment, this reduces adding more flour to the dough. I also use 1/4" roller bands - this will give you consistent thickness.


And here's a tidbit for you, a tombstone cookie cutter from Halloween will make a perfect Popsicle shape!


I really wanted to make these cookie pops - that adds a huge part of the whole Popsicle idea, right? I can not shove those sticks in nicely. I've tried a bunch and read many articles, but it's always a disaster. So here's what I do. Once the cookies are completely cooled - like the next day - I spread a thick layer of melted candy wafers on the *back* of the cookie, gently sink in your stick and cover with a heaping spoon of more melted candy. You can smooth it out much better than I did, but it's the back and it's candy - I figure no child is going to care or complain, right?


Then I decorated using Bake at 350's Royal Icing recipe. I use the original recipe for piping the sides,ice shading, eyes and smile. You will need to thin it down to flood the cookie. Once it has dried, I painted on a bit of light corn syrup and sprinkled clear sanding sugar.

All done! They just need to be wrapped in cellophane, tied with a ribbon and note.

Stay Cool!

Monday, May 18, 2015

Can't Let It Go, Let It Go


I can't believe my first born turned 7 a few months ago. It honestly seems like just yesterday when I could feel her kick in my belly at the sound of her Daddy talking. She has always been an old soul though - full of wisdom and kindness. Those who know her, know she exudes a sunshine that is unique. My sweet girl requested a Frozen birthday and I did my best to accommodate!


When we celebrate birthdays, we tend to make it at least a week long party. A quick tulle wreath for the front door - adorned with vinyl and lots of glitter! Her face would light up every time she saw it when we would drive up to our home.


A banner in her name and a snowball (cotton balls) garland in the front room. Her name and snowflakes were cut on vinyl and the pennants are metallic cardstock. 

A peek-a-boo vinyl decal for our family room lamp - the image is from Cricut's Frozen line.


A watercolor invitation with lots of glitter and boxed up with a ribbon. These were one of her most favorite invitations!

Since her birthday is in early spring, all the Utah snow had melted and we were able to have the party outside with her friends.
 

We had snow-capped Elsa punch - such a hit with the kids! And amazingly there were no blue puddles in the kitchen after the party.


Olaf noses in the snow (baby carrots with ranch dip).


Kristoff ice cubes (blue raspberry Jello jigglers).

 Elsa's favorite fresh fruit..


And a Rock Troll salad (Cesar salad).


Since all the snow had melted, we couldn't build a snowman. Instead we drew Olaf all over our brick fence - no worries, chalk washes off and the kids loved it!


Kiddo wanted to create a game of her own for the party. She drew Elsa and cut out magical snowflakes for a fun game of pin the snowflake on Elsa. Isn't she so creative!


The children blew a bubble reception for Elsa! Elsa was amazing! If you live in Northern Utah and would like to invite her to your party, she can be found at Part of Your World Princess Parties. We received no compensation for this review, we just truly loved her! I still hear about how wonderful she was from my daughters and the guests!


There was a story time out on the lawn - the kids were hanging on her every word!


Singing and dancing with Elsa..


and lots of time for photos!

When Elsa had to return home, it was time for desserts!
First we had Anna's Frozen Heart cake pops..


And this year my daughter requested a cake from the bakery. It was delicious, affordable and was one less thing for me to worry about. Win, win!


The kids took home a goody bag of white & blue rock candy wands because I'm sure they needed more sugar in their life.. Sorry parents!

It was a wonderful birthday and party. These childhood years fly by, I will never regret making a big deal on their special day.

Now, can we let it go?

Sunday, May 17, 2015

Learn How To Surf


I worked this up today in watercolor for the prompt of skill.

Learning how to roll with life's waves is a necessary skill, but not one we are born with. Our lives have been so crazed since last June. We've had so much turmoil and strife in our inner circle. Sadly, the trend has not ceased, but we have learned to surf holding hands and waiting for the waves to cease.


Saturday, May 16, 2015

Inside the Sketchbook

Some of the pieces I have been working on in my sketchbook...


This was for the daily prompt of - Mom. It's a watercolor based off my last maternity photo shoot.

This one I chose to do on a canvas with acrylics. It's titled "Yesterday" - a nostalgic memory to keep the wonder of childhood alive. It will be listed in my Etsy shop next week.


A different style for the daily prompt of something that starts with the letter L. In the end a lot of people choose a lion. This was a watercolor and pen sketch in the sketchbook.


 A watercolor and pen commentary on social media for the prompt of reward. In the end only we know if we have bent our personalities to fit a mold. It's something I fight against on a regular basis.


And this last piece is in progress. A tiny vignette of retro Disneyland was more work than I anticipated - lots more more layers and details to do, but it does make me happy. 


Friday, May 15, 2015

Quilt Alliance - Animals We Love


Every year the Quilt Alliance has a contest and auction to raise money for their nonprofit organization. They were established in 1993 with the intention of documenting, preserving and sharing the American quilting heritage. 

I have participated in their contest every year since I first discovered it in 2010. Creating a quilt based on their theme always invigorates me and brings me back into quilting. This year the theme was, "The Animals We Love." Recently we have frequently watched the Mexico themed movie, "Book of Life". After chatting with my husband, who is of Mexican ancestry, we came up with the idea of a sugar skull bull, a Muerto Toro.

I started the quilts with improvisational piecing of black and white fabric. I wanted the background to be neutral, but also have contrast to the bright colors that would be placed next.


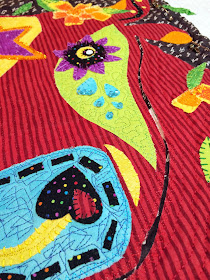
Then I freehand cut the basic shape and large shaded areas of the bull face in bright, fanciful colors.


Once I was happy with the general layout, the large pieces were machine appliqued on with matching thread. Then I freehand cut the small applique accents to the bull face.


The background then became a little too quiet and I needed some color impact. I quickly drew out flying geese on a narrow strip of paper to foundation piece on.


That linear flying geese looked incredibly abrupt placed into the improved back. I did more chopping and moving so that it flowed better. The color shapes became representative of  fans cheering the Toro on in the ring. Since marigolds are traditional at Dia de los Muertos, there is a giant bloom on Toro and petals thrown from the crowd. It is now realized that Toro is no longer a fighting hero, but has fallen and moved into the next world.


All the small applique bits are hand embroidered on with perle cotton in unique touches.

Large Swarvoski beads are couched on to Toro's eye and falling tears.

Bright and in your face graffiti machine quilting covers his face and the crowd. 


The remaining background of black and white are lovingly hand quilted in big strokes with perle cotton.
I love Toro and was sad to see him off, but I hope he raises lots of money for the Quilt Alliance. And I maybe fully intending on buying him back at the auction!

I am entering this quilt and blog post into the Blogger's Quilt Festival on Amy's Creative Side. If this quilt is one that you love, please consider voting for it. XO