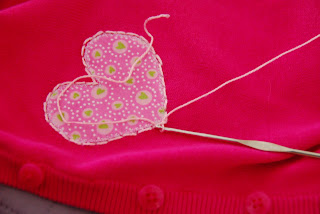
I have been wanting to make the girls special Valentine clothes. It dawned on me after I made my homework for Jenny Doh's class, that my little crochet heart applique would be adorable on a shirt!
There are NO plain shirts at Target, my favorite place to shop with the girls. Not a single plain white, pink, or red shirt in sight.. I couldn't believe it. I ended up getting a matching set of dark pink cardigans. This is actually a better idea since we are still getting snow in Utah.
OK, are you ready to see how it's done? Here we go..
*This project involves basic machine sewing and crochet stitches*
What do you need?
*5" square of fabric (the heart applique)
*starch
* item of clothing to decorate
*pearl cotton, size 5, in coordinating color
*embroidery needle
*size 1 crochet needle (don't be afraid!)
*lightweight fusible stabilizer
*fusible fleece
This starch technique is not mine - I read about it on Piece N Quilt, an awesome site & tutorial worthy of your time. You basically want to oversaturate your fabric square with starch and lots of ironing. Hop on over to the site to get the full details. This will prevent your fabric from unraveling. Yes, you can use fusible webbing if you prefer, but I think this is just as effective and quicker.After lots of starching & ironing, I freehand cut two hearts out (one for each of my girls).
Here are my two heart appliques. I was thrilled to find a scrap Valentine fabric with green hearts - green is Kiddo's all time favorite color!
Next I spray and pin basted the fabric heart on top of the cardigan.
Then cut a small piece of lightweight fusible stabilizer - large enough to cover the size of the applique, but not too much bigger. Place the adhesive side of the stabilizer to the backside of the cardigan, right behind where the applique is going. Iron, iron, iron..
Most likely whatever clothing item you are sewing the applique to, will be a stretchy material - this stabilizer will cut down the curse words you say while you sew.. Don't bypass this step, it is important..
Now with a fairly small zigzag, sew the heart down. You don't want it so small that it doesn't catch the fabric well, but you don't want it too large either. I used a size 3 on my machine and that was pretty close to perfect. I did use white thread, but monofilament is my favorite...
Take a length of the pearl cotton thread and thread it on the embroidery needle. Then complete a backstitch outline of the heart. You want the stitch length to be about 1/4" long. If you make the stitches too much smaller, you will fight with your crochet needle later. You also don't want to make the stitches too much larger or it will be loose on the fabric. It's not imperative that they are absolutely the same size, just as close to 1/4" as possible.
Here it is all stitched up.. Now time for the fun!
Using the same pearl cotton thread, at the bottom of the heart begin crocheting single stitches through the 1/4" backstitch. For some of my stitches I was actually able to fit two single stitches in. This part doesn't matter.. The important part is to single crochet all around the perimeter, using the backstitches as a base.
Here it is all done. I think it looks pretty adorable just like that! But I continued on to make it a bit more ruffly..If you want to stop there, just sew in your tails and iron a small piece of fusible fleece on the back of the cardigan, covering your stabilizer and stitches.
If you want to continue..
Slip stitch into your first single stitch; you will be creating a picot edge.
In every single stitch, you will:
slip stitch, double crochet, slip stitch.. all the way around.
It gives it a little bumpy ruffle.
Once you reach the last stitch, slip stitch into the first and sew in your tails.
Iron on a small piece of fusible fleece and you're done!
If you make some, please let me know! I would love to see it..
And if you need clarification on any steps, just let me know..


No comments:
Post a Comment