Showing posts with label hooked on sewing. Show all posts

Sunday, September 9, 2012

Hooked on Sewing - Halloween Coasters

I'm so excited to dive back into my "hooked on sewing" projects. The latest one I created is listed now in my Etsy shop. I have wanted to make my reversible coasters for awhile. The backs are crocheted rounds with hand appliqued fabric on top. Perfect coasters!


I love these coasters are soft..with two young kiddos I'm always trying to create beautiful items for the home that can not be easily broken or ruined.. Most of our ceramic coasters were damaged in the last four years..

These coasters won't scratch your table, won't break on tile, or hurt little one's teeth if they decide to trying chewing on them.. Not that my kids ever tried to chew a coaster before..


Lots of more Halloween goodies coming soon! Have you started making projects for the fall season yet?

Wednesday, May 16, 2012

Prepping for Quilt Market

Today I'm guest posting over at Quilting Gallery - one of my favorite quilting sites! I'm presenting how to create my business card pouches. I made these for a few special contacts at Quilt Market (and yes I'm counting the hours till I board the plane!)


Want to read more about my inspiration to go above and beyond with my cards? Check out my friend, Topsy Turvy's post on her AMAZING cake pop/business cards. Such a creative way to leave a lasting impression! 


Hope to see you at Quilt Market! May the shopping and dreaming begin..


Thursday, March 22, 2012

Eggcellent Series #5 - Crochet Easter Egg

Thank you so much for joining me this week. I hope you have learned some new techniques and have been inspired to create a pillow. If you have any questions, please feel free to email me any time.

Today I will you show you how to crochet on an applique. However today of all days, because that's how it works, neither of my two sweet kids would nap... so I originally planned to do 3 pillows - 2 bunnies and 1 egg.. and I had time to do the one egg..  Gah! Heartbreaking for me, as I was really excited to bring you this technique. I may revisit it again before Easter with all 3 pillows, photographed beautiful with abundant sunlight. Until then..


Materials Needed:
Plain store bought pillow cover
Scrap fabric for applique
Scrap piece of fusible webbing
Perle cotton - cream and pink
US 7 crochet hook
Embroidery needle


 Step One: (Boo.. I know it's the bunny, but I've been working on these all week and thought I would have all three done..) Anywho.. Draw out your applique shape and make sure it will fit on to your pillow cover.
 Step Two: Iron on the fusible webbing to the wrong side of the applique fabric.
 Step Three: Trace and cut out your applique shape; iron on to the pillow cover front.
 Step Four: Straight stitch the applique down to the cover.
 Step Five: Using the perle cotton and embroidery needle, backstitch around the perimeter of the applique. You want to try to keep your stitch as close to 1/4 as possible. It doesn't have to be exactly 1/4", but try to be consistent with the stitch size. It is important that the crochet hook can slide underneath the stitch, but that the stitch is not so large that it sags off the fabric.
 Step Six: With your hook and perle cotton, single crochet in every stitch around the perimeter. Slipstitch the last stitch to the first.
 Step Seven:  Draw out your design on the applique with an erasable pen.
 Step Eight: Backstitch the design with your perle cotton and then single crochet in each stitch.
And there you are! I love this added dimension to quilting & sewn projects. I think this pillow would look awesome with some crayon tinting too.. Hmmm. Another week of pillow projects? Nah.. ;o)
Have some amazing Easter projects of your own? Come on back tomorrow to share!

What's coming next week?
I'll share the highlights of some my past Easter projects and show you how to do another crochet/sewing tutorial for a ruffled diaper cover - perfect for spring photo shoots..

Wednesday, February 15, 2012

How To Soothe The Soul

This past week we had a sudden death in our family on my husband's side. It was a shock that I think we are still reeling from. I am quite the emotional sponge - I stopped reading and listening to the news back when I was pregnant with our second daughter. It's very hard for me to disengage my emotions and carry on. However, when my husband rushed to his hometown with our eldest daughter, the house was TOO quiet at night. I decided that "working" may be the best for me.. so I completed my quilt for Project Quilting. Our theme was a tool prompt, and we had to incorporate 4 pieces of inspiration.

I present "And Sew It Begins.." I depicted the sewing machine and scissors in a literal format. I crocheted on the bottom of the machine (my third tool) and lots of free motion stitching (my fourth tool). It's a cheery little piece. I'm debating if I want to display it my studio as a reminder that art is a great way to work through my emotions.


In my opinion the best & worst thing about life, is that it goes on. The sun comes up, the children need to be fed, and our lives continue.. The loss of Darlene is deeply felt in our home and we wish peace to all who knew and loved her..

Thursday, February 2, 2012

Valentine Sweaters For The Girls

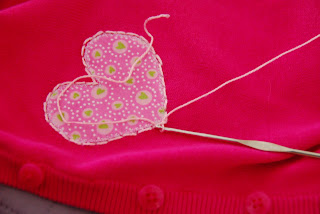
I have been wanting to make the girls special Valentine clothes. It dawned on me after I made my homework for Jenny Doh's class, that my little crochet heart applique would be adorable on a shirt! 

There are NO plain shirts at Target, my favorite place to shop with the girls. Not a single plain white, pink, or red shirt in sight.. I couldn't believe it. I ended up getting a matching set of dark pink cardigans. This is actually a better idea since we are still getting snow in Utah.

OK, are you ready to see how it's done? Here we go..

*This project involves basic machine sewing and crochet stitches*


What do you need?
*5" square of fabric (the heart applique)
*starch
* item of clothing to decorate
*pearl cotton, size 5, in coordinating color
*embroidery needle
*size 1 crochet needle (don't be afraid!)
*lightweight fusible stabilizer
*fusible fleece
This starch technique is not mine - I read about it on Piece N Quilt, an awesome site & tutorial worthy of your time. You basically want to oversaturate your fabric square with starch and lots of ironing. Hop on over to the site to get the full details. This will prevent your fabric from unraveling. Yes, you can use fusible webbing if you prefer, but I think this is just as effective and quicker.

After lots of starching & ironing, I freehand cut two hearts out (one for each of my girls).
Here are my two heart appliques. I was thrilled to find a scrap Valentine fabric with green hearts - green is Kiddo's all time favorite color!
Next I spray and pin basted the fabric heart on top of the cardigan.
Then cut a small piece of lightweight fusible stabilizer - large enough to cover the size of the applique, but not too much bigger. Place the adhesive side of the stabilizer to the backside of the cardigan, right behind where the applique is going. Iron, iron, iron..
Most likely whatever clothing item you are sewing the applique to, will be a stretchy material - this stabilizer will cut down the curse words you say while you sew.. Don't bypass this step, it is important..

Now with a fairly small zigzag, sew the heart down. You don't want it so small that it doesn't catch the fabric well, but you don't want it too large either. I used a size 3 on my machine and that was pretty close to perfect. I did use white thread, but monofilament is my favorite...
Take a length of the pearl cotton thread and thread it on the embroidery needle. Then complete a backstitch outline of the heart. You want the stitch length to be about 1/4" long. If you make the stitches too much smaller, you will fight with your crochet needle later. You also don't want to make the stitches too much larger or it will be loose on the fabric. It's not imperative that they are absolutely the same size, just as close to 1/4" as possible.
 Here it is all stitched up.. Now time for the fun!

 Using the same pearl cotton thread, at the bottom of the heart begin crocheting single stitches through the 1/4" backstitch. For some of my stitches I was actually able to fit two single stitches in. This part doesn't matter.. The important part is to single crochet all around the perimeter, using the backstitches as a base.
Here it is all done. I think it looks pretty adorable just like that! But I continued on to make it a bit more ruffly..If you want to stop there, just sew in your tails and iron a small piece of fusible fleece on the back of the cardigan, covering your stabilizer and stitches.

If you want to continue..
Slip stitch into your first single stitch; you will be creating a picot edge.
In every single stitch, you will: 
slip stitch, double crochet, slip stitch.. all the way around. 
It gives it a little bumpy ruffle.
Once you reach the last stitch, slip stitch into the first and sew in your tails.
Iron on a small piece of fusible fleece and you're done!

I hope you love it! It's a fun technique that you could use a lot of different ways. Wouldn't this be fun on a set of tea towels or pillow case?

If you make some, please let me know! I would love to see it..
And if you need clarification on any steps, just let me know..

Wednesday, February 1, 2012

Learning From Jenny

A few weeks ago, I saw Jenny Doh post about her publishing class. I told myself I couldn't afford another class that month. Then I reminded myself that I've had one book deal fall through  and had yet to finalize the two that are under review.. I wondered if there was something that I was missing.

There was..

I remember when I first presented my super secret book idea to the first publisher. I was excited, I had a book outline, I had project instructions.. I didn't have completed samples, I didn't have evidence of it on my blog. It was a secret! I couldn't share it online. What if someone saw it and ran with the idea before I could? What if someone could get it published before I could? What if the publisher thought there would be no reason to create a book of projects that I had already shown the world? What if, what if, what if?? And so I didn't share on my blog. And so I didn't  show evidence of an art that I'm passionate about. And so the book deal was dropped. Maybe the publisher was concerned that I didn't have enough experience. How could they know if I didn't give them reason to believe?

I accept that my worse fears may still come true, but I also believe that unless I take that chance, my art is without purpose. I truly want to inspire others and help break ground on a new genre of mixed media. I hope you will take that journey with me.

So what is at the heart of this secret. my super cool book idea? Well I've become passionate about mixing the art of crochet with quilting and sewing projects. I have researched and developed methods of incorporating the two art forms. Below is a picture of my homework assignment from the fabulous Jenny. It is a quilt square with an appliqued heart and crocheted trim. The crochet is done actually on the quilt square! 


Do you like it? Do you want to learn more? I sure hope so.. This week I'll show to create this project as an adorable Valentine shirt! I hope my tutorial will be something you want to make. I hope you DO make it and show me.. I hope I can get you excited about this...

Whew.. see that wasn't so hard. It's amazing to me that I thought I had truly learned the lesson to create with my hand open. To share, share, share.. And last night I realized my fingers were still slightly clenched.. Thank you Jenny Doh for helping me relax and enjoy this crazy journey..

Monday, October 10, 2011

Blankets!

I am doing a ton fun guest posts this week and will be have tutorials for both Moda & AccuQuilt. In the meantime, I wanted to share with you some of my latest items on Etsy. My little store has been neglected with all the amazing new events in my life. I'll be adding more Halloween goodness later this week. In the meantime, check out these fun blankets!


This is hands down my favorite blanket ever.
Babies will love the eye candy on the cotton fabric
and fun caressing the chunky crochet of the yarn on the back!

Tuesday, September 27, 2011

Are you a good witch or a bad witch?

Here is Lil' Witchy.
She is perfect to make into a pincushion, sachet,
or to place on your Halloween mantle.

She is easy crochet with a wee bit of hand sewing if you choose.
She can be made in about an hour with scrap yarn.

She can be good..
or bad..


I will be adding more patterns & items for sale on the blog now.
I don't know why it never occurred to me before that I do that...


.

Related Posts Plugin for WordPress, Blogger...