Wednesday, December 18, 2013

Cold Porcelain - Recipe, Tips and a Christmas Ornament

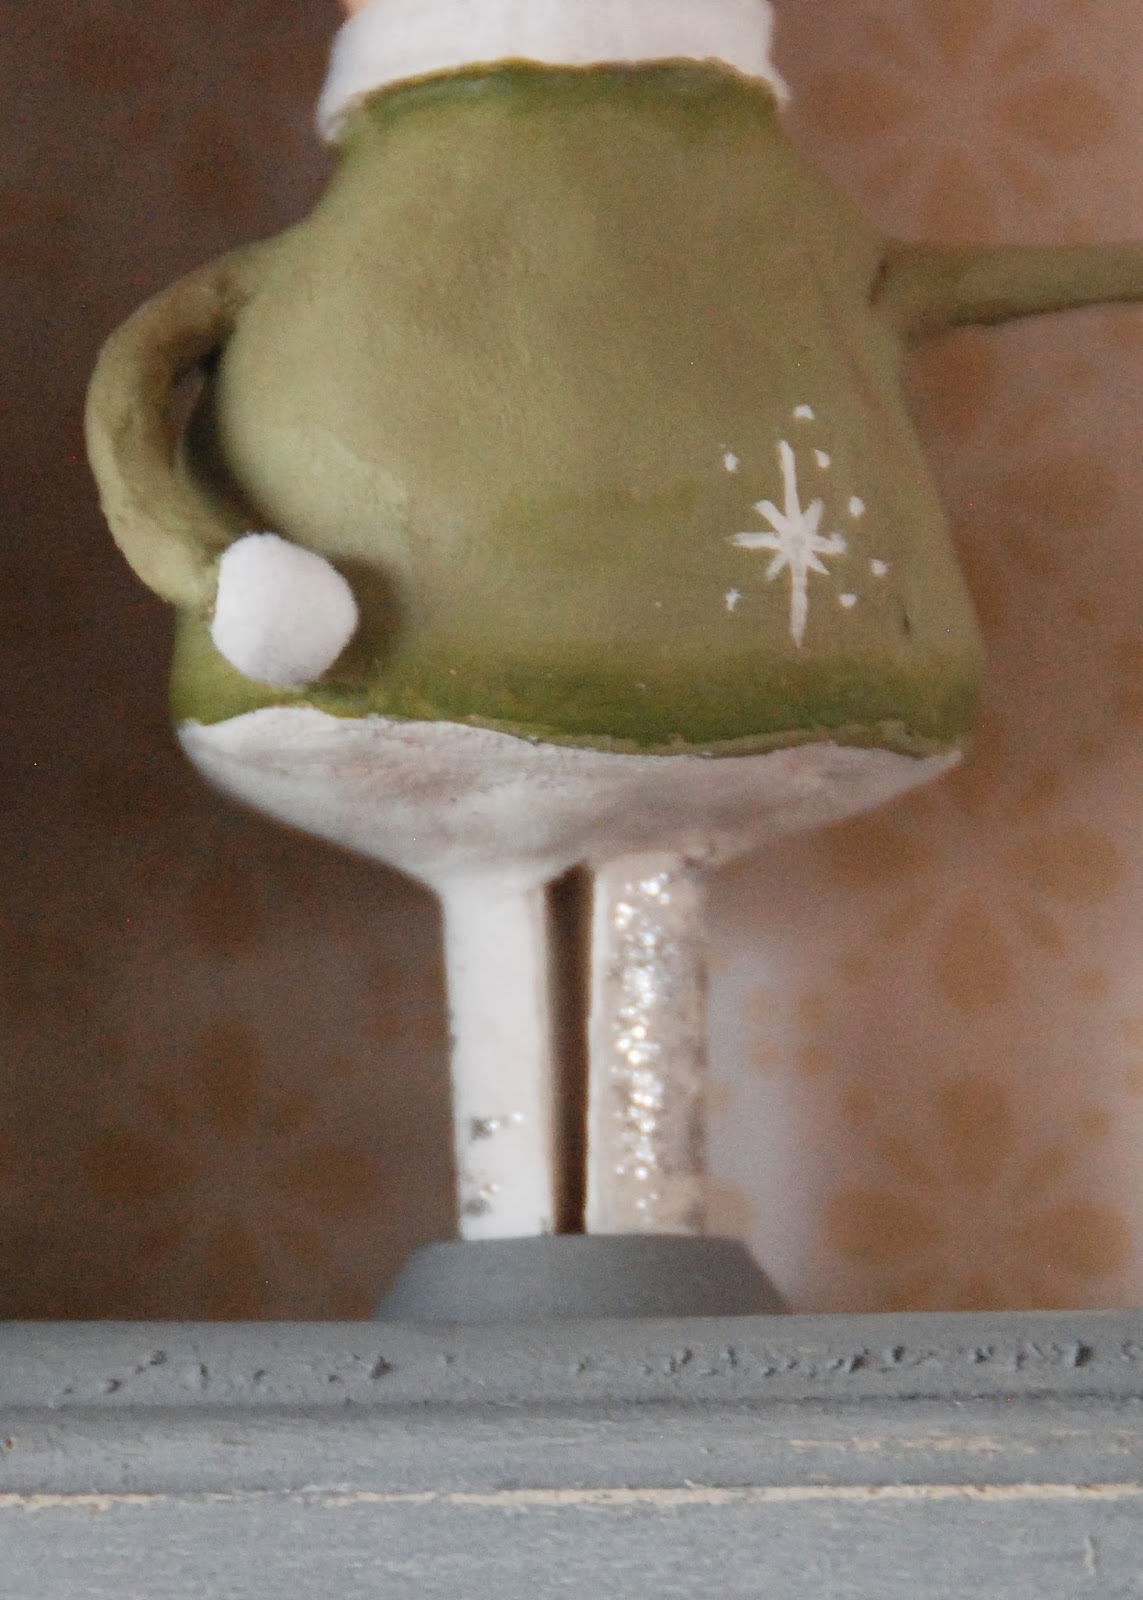
When I first began searching Pinterest for clay ideas, I ran across one called "cold porcelain" a few times. For some reason, the name kind of rubbed me the wrong way and I didn't pay it too much attention. I think I randomly categorized it as a child's clay or a play-dough alternative. And well, it can be those, but it is also an amazing air dry clay that you can create for just a few dollars and it is very versatile! I created the mended heart in the ornament above from it. I'm going to tell you how to make it and give you some tips along the way.

To make cold porcelain you need:
1 cup of corn starch
1 cup of school glue 
(if measuring glue sounds fun, let me spare you some messy grief.. you basically need 2 full bottles of the regular sized glue as show below)
1 Tbsp lemon juice
2 Tbsp mineral oil, or baby oil, or a kitchen oil
(i was given a ton of baby oil with all three of my babies and i never use it on them - so that is what i used)
Lotion - for kneading

*This is a microwave version, you can absolutely cook it on the stove over low heat. Whatever utensils and/or pots that are used, please use them for crafts only and do it use them for food.


1.) In a microwave safe container, mix the glue, oil, and lemon juice together with a disposable spoon. Then add the corn starch and carefully mix together until well blended. It will resemble something like curdled cream.

If you have children that love to help, this is the best step for them to be involved.

2.) Place the mixture in the microwave and heat for 30 seconds. Quickly take it out and mix it well with your spoon. You will do this a couple of times.

How long? Well.. a number of recipes I found on the internet gave me all sorts of intervals and it always undercooked my clay. Here is my advice, you need to pay more attention to what the clay is doing rather than how many times it has been in the microwave. The clay will be ready when it is pulling from the sides of the container, it will have a matte sheen and hold a stiff peak. It roughly takes me 2 minutes total, but please pay more attention to the clay then time.

3.) Once the clay is well cooked, it will be super duper hot. Like Hades hot.. and you have to knead it. Don't let the kiddos help with this. Cover your hands well with lotion - this help the clay from sticking to you and it helps with the intense heat of the clay. Knead, knead, knead. You can do it on a lotioned up piece of saran wrap as seen below. Your clay will have a delightful, slightly elastic texture to it. Wrap it up in the saran wrap and place in an air tight container. Let it rest overnight in the fridge and you can play with it tomorrow!


Since this is an air-dry clay, you must try to keep it wrapped up tight. It can last for several weeks if well protected.

It will dry completely in 24-48 hours. Don't try to manipulate it during the drying process or it will become vulnerable to cracks and breaks.

It will be a translucent cream when dry unless you add pigment to it. You can color it with acrylics, oils or chalks. You can also paint it after it has dried. The heart I created was painted after the drying process.


Since this is an air-dry clay, there is considerable shrinkage during the drying process. I've never had a piece crack or break, but your optimum minimum thickness in my opinion would be 1/8-1/4" thick. Definitely something to consider if you like to use an armature. I am happiest with its use in molds or moldings without armatures.

It is a great clay to play with and because it is so relatively inexpensive, this is a great clay to use with children. I think it has amazing potential for more sophisticated art pieces as well.

I hope you will give the recipe a try and please let me know if you have trouble. My first batch was a messy, gigantic failure that occurred right before the baby woke from a nap. FUN! And if that happens to you, just try again. The biggest piece of advice I can give you is to really mind the consistency changes of the clay during the heating process. You want it matte, pulling away from the container and stiff peaks!

Happy holidays!
xo,
Jenny

Thursday, December 12, 2013

Here Comes Santa Claus!


I've had to take steps back in the amount of time I can work. Two out of three kids are waking at 4am on a regular basis. Yeah - boooo.

But I won't be a Grinch! In the spare 15 minutes here and there, I've been working on my Paperclay Santa Claus. He just makes me happy.


The beard was a ton of fun to create!


Lots of glitter on his hat muff and collar, but near impossible to photograph. Sigh.


And fun little chicken legs!


I tried a one-step crackle medium that was a HUGE flop! Do you have one that you like? I'd love a recommendation!

Happy holidays!

XO,
Jenny

Wednesday, November 27, 2013

Merry Christmas - Playing With Paperclay


I've been having so much fun with polymer clay, I thought I would experiment with Paperclay. I tried it briefly a long time ago and didn't have success. Too much or too little water and little patience or understanding. Well, now that I have three little ducks, against my nature I've actually developed some patience. I figured I would put this new skill to use and try Paperclay again. And yes, there is a learning curve. However, this is my third project with it! I'm very happy with the final piece - it's exactly what I pictured in my head. A little vintage looking, very prim and so sweet. 


These sisters are getting ready for Christmas and are wishing you the very merriest of holidays!


It maybe hard to see but there is glitter in abundance. The "merry" sign is decked out in a snowflake white glitter and the dolls' legs shimmer with a touch of silver. 


 I also have a huuuuge collection of different colored flocks. I added white flocking to both doll's mittens and their coat collars. Soft and velvety!


Even a few Paperclay ornaments on the wreath and lots of German glass glitter.

I will be getting back to to quilting after the Thanksgiving holiday. The mad dash to get all the quilty Christmas gifts done. However, I'm hooked on this Paperclay. Maybe it's because I had no interest in dolls as a child? I don't know, but my inner child is quite happy and eager to play again soon.

Tuesday, November 12, 2013

Playing In Clay

I had a huge surge in quilty inspiration after the baby was born. Last month I was working on 6 quilts plus a number of sewing projects for a book coming out next year. And what does all that sewing do to me? It makes me want to throw it all in a box and run away. I'm not sure why, but all that inspiration and work leaves me exhausted and in need for a break.

And then I had a great blog post idea, I was going to give all my tips on how to juggle children while pursing an artist career. Wouldn't you know it, the baby boycotted naps for 2 weeks and the very last thing I felt like doing was giving balance tips to anyone. Oy! That post is saved for a time when I feel like Supermom.

What to do with no desire to sew, little time to work and a desperate need for creative time? I picked up some clay and had a blast!


Saturday, October 26, 2013

Liberated Quiltmaking - Fall Abundance

I finally finished "Fall Abundance" - I love it so very much. There were many hours spent creating in this liberated quiltmaking style. It was a labor of love and I kinda hope it will stay around for a bit. But, if you love it as much as I do, it is my very first item listed on Big Cartel .

I tried a new quilting motif - at a friend's suggestion, I created a meandering leaf pattern.


A liberated Modern Maple..

 The back is wholecloth fabric from Riley Blake and was bound in a dark chocolate feather fabric.


It's so beautiful, even our WolfMan wanted to snuggle in it..

Loving the crunchy leaves, shorter days and crisp air..

Linking up to Amy's Blogger Quilt Festival

xo,
Jennifer

Monday, October 7, 2013

Why I Chose To Leave Etsy

Let me start off with gratitude. I am so grateful for every Etsy buyer that trusted me to create something beautiful for them. I am grateful that for a number of years I was able to bring home a large chunk of change to my dinner table. I am grateful that I have a family that supported me, watched as I worked crazy hours and believed in my dream.

I am so very grateful for what Etsy was, but things have changed. Somewhere in the last couple of years, the heart and soul was lost. The beautiful handcrafted community has been blanketed by mass amounts of resellers. I'm not talking about those selling supplies or vintage goods - there is no ambiguity there. I'm talking about those shops that are selling mass produced items under the false guise of handcrafted.

Now personally my niche is not really at stake. Art and quilts don't normally have mass produced competitors. However it is what Etsy is not doing that has pushed me to leave.

I don't want to dwell on negativity. To each their own, but I've decided that is something that really matters to me and I have to stand my ground. I will continue to buy on Etsy from the sellers I know and love. I hope that in the future things will change for Etsy. In the meantime I have closed up my shop and will be trying out Big Cartel. There is a link to my shop in the header. You can also peruse the gallery to see some offerings.

xo,
Jennifer


Tuesday, October 1, 2013

Liberated Halloween Baby Quilt


I love to make a few things for the kids for the holidays. I had planned to make the girls' Halloween skirts and baby boy a pair of pants. Unfortunately, the first skirt pattern I used was written with incorrect measurements. I had to scrap the skirt and in the end, I didn't have enough fabric to make baby boy's pants. The agony of being the third child..


Rather than toss the scrapped skirt in the trash can, I decided that I would cut it apart and create a stroller quilt in my favorite improv style. Makes perfect sense in high insight, he can use the blanket daily and get much more use out of it.


I used the Riley Blake fabric as focal points and improv pieced around them. They are so cute and get a ton of attention. I love sweet Halloween fabric that is not overwhelmingly scary.


I've seen a few quilting friends rave about how fun striped binding is. Luckily I had the perfect fabric for it and I love it! It is just the right, fun touch to the quilt.


So when life or sewing gives you lemons, it's time to make some adorable lemonade!

Sunday, September 22, 2013

First Art Book Publication - Incite, Dreams Realized: The Best of Mixed Media

When I decided to branch out into textile art and mixed media earlier this year, I never dreamed that it would go very far other than fulfilling my inner desires. I'm so honored and excited to be published in my first art book - Incite, Dreams Realized: The Best of Mixed Media. This book holds such amazing eye candy and inspiration.


And here is my page..

I have another textile collage art piece in the works. It's quite large and has taken some time, but I'm hoping to reveal the macabre twins soon..

I hope you will pick this book at your local bookstore or on Amazon - I just know you will love it!

XO,
Jennifer

Friday, September 20, 2013

Liberated Fall Quilt Process and Other Halloween Fun

One of the all time favorite quilts in our home is the Halloween one I created last year. Regardless of the time of the year, that one gets pulled out a lot. And as a Halloween nut, I figured I should make some more fall quilts to enjoy. I decided to shelve all those WIPS I've been trying to finish and dive into some liberated quilting fun! Here is a bit of my process..

 Lots of yummy orange scraps..

The makings of the first liberated pumpkin quilt block..

A little trial and error. I hated that stem.. thought it made my pumpkin look like a orange..


Playing with the idea of stripe borders..


More blocks done.. Filling in with improv cream blocks that I started months ago..

Inspired by the Modern Maples on my Instagram feed and decided to try a few liberated ones..

And it's coming together.. Almost done. Just need to finish the bottom row of piecing, quilting and binding. Hoping to add it to the Etsy store before the end of September. It will be a smallish quilt - perfect wall hanging or the autumn baby due any day.


Now that my parents have moved here, it is such a treat to have crafty nights with my Mum. She treated me to this gorgeous wreath class at Thanksgiving Pointe. So much fun and I love having new decor on our front door. The technique was super easy and wouldn't this be in great in other motifs? Maybe a creamy, vintage Christmas?


I've been busy working on the liberated fall quilt and a number of projects for a book due out next year. The kiddos have grown tired of hearing about how none of it was for them. This past week I surprised the girls with some new fun skirts..

And a pattern I used online had some very off measurements, sadly I had to scrap one of the skirts and try something new. I love this little liberated piecing in the skirt and it makes my kiddo smile. Make lemonade, people, especially when it's designer fabric that is at stake!


I hope it is cooling down where you are and your thoughts are full of pumpkin spice lattes, jumps through crunchy leaves and enjoying the start of the holidays..

XO,
Jennifer

Monday, September 2, 2013

Back to School, Back to Work

Phew! What a summer.. We've had such a wonderful couple of months getting to know our little bundle of joy, Tommy. He is a pure delight - sweet, mild tempered with the cutest laugh. Here he was a month ago - time is flying by.. Don't you just want to pinch those cute, little chubby legs?!

We decided to hold off on homeschooling till next summer. Since Tommy is our last baby, I wanted to spend this precious year with some quiet time with him. Luckily the girls are wild about their school and we were eager to return.


I returned to my work as a librarian about a month ago and this week have been able to return to my work as an artist. I just finished my first solo art show and sold one of my favorite pieces, "The Raven". I also signed my 4th book collaborator contract. I'm so excited and honored to have a number of fun patterns coming out this year and in 2014. The first book is out right now and available on Amazon, Incite, Dreams Realized: The Best of Mixed Media.

It feels wonderful to be surrounded by my amazing, loving family and have the ability to return to the art world as well. I want to thank you for your patience this summer with my blogging break. I'm ready to come back and can't wait to share with you!

For now, I'm off to ignore my pile of WIPS in the corner and start a new Halloween quilt. This one will probably make its way to Etsy too..


Thursday, July 11, 2013

Chalkboard Art and a First Birthday

I have to admit, I have not been a fan of the recent craze in chalkboard art. I can't give you a good explanation as to why it didn't appeal to me -- all I can say is now I'm really wishing that I had taken a class. Thanks to my late night Pinterest hobby, I came across some adorable photos of using chalkboard art to celebrate the monthly milestones of newborns.

(photo from Pinterest - does not link to correct page, but photo credits Angela Photography
if you have the correct link, please let me know and I'll update!)


(photo from Pinterest - The Photographer's Wife)

Aren't those fun? If you search "chalkboard art monthly baby" on Pinterest, you will come up with a slew of ideas. Luckily my Mum had a fabulously large vintage chalkboard that I could use..since I've snubbed this trend, I did not have my own.

And my chalkboard was.. well.. beginner to say the least..

Take 1..


Take 2..


Alas, I have some room (a ton of room) for improvement on my chalkboard and photography skills. But, this was such a fun way to celebrate Tommy's first month birthday. Can you believe it? Oh time, you fickle mistress.. please slow down and let me have this precious year go ever so slow..

.

Related Posts Plugin for WordPress, Blogger...