Showing posts with label freebie. Show all posts

Friday, March 6, 2015

St. Patrick's Day - Lunch Box Notes - Free Printable

all things belle - st. patricks day - free printable - lunch box notes

I loved getting notes from my parents in my lunch box. Maybe it was a hard morning or even a fantastic one, but to open my lunch pail and get a note of love was the best. Children are always hungry for reminders of how precious and loved they are, but it can be hard to remember to tuck one in. There's homework to pack, teacher reminders and more. 

I thought it would be fun to watercolor a few St. Patrick's Day lunch box notes to share. There are a dozen formatted to fit on letter sized paper. Print them off tonight on some medium-heavy weight cardstock and tuck them in the kitchen junk drawer. When it's St. Patty's Day week, you can toss in a note of love. I think these are so fun, I will probably hide a few in my husband's coat pocket and gym bag. Who couldn't use more love, right?

all things belle - st. patricks day - free printable - lunch box notes

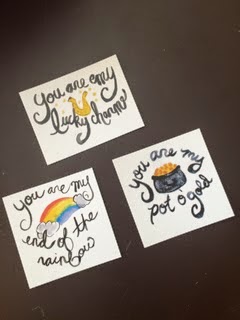
You are my end of the rainbow.. These would be adorable with a snack pack treat of Skittles!

all things belle - st. patricks day - free printable - lunch box notes

You are my pot o' gold.. Mmm, Maybe a few Rolo chocolates to sweeten the day?

all things belle - st. patricks day - free printable - lunch box notes

You are my lucky charm.. My kids always cheer over a serving of Lucky Charm cereal. They promptly eat the marshmallows and are no longer hungry for the healthy bits!

all things belle - st. patricks day - free printable - lunch box notes

A fun printable that is sure to bring a smile to those you love! I am lucky to homeschool my brood, but it seems like more often than not, they are on the go during lunch. I can't wait to sneak a few in their lunch pails!


Sunday, June 24, 2012

The Adorable & Easy Sewing Machine Cover


Lately I'm all about hand embroidery. I love how portable it is; I can work on it for a few minutes throughout the day with the rare moments my crazy girls give me. I originally started this embroidery for the 4th of July, but since I pursue happiness almost daily on my sewing machine, it seemed appropriate. And I loved how this line of Blend fabric designed by Charlotte Lyons coordinates with the patriotic colors.

The embroidery pattern can be downloaded here. I used 2 strands of floss for the pinwheels and a single strand for the grass and words.

This is a super easy project and is fabulous way to showcase a piece of embroidery or some pieces of special fabric. You can create this with a few fat quarters and lengths of ribbon!

1.) Measure your machine from the bottom at the front to the bottom of the back (as seen in picture below), my machine measured in at 27". You will also need to measure the width of your machine, mine was 18".


2.) We will now cut the fabric for the inside of the sewing cover. Cut your desired fabric a 1/2 larger than each measurement you just calculated. So, my inside fabric was cut 27.5" x 18.5". I choose to use muslin fabric, but you can create this to be a reversible cover.

3.) The back of my fabric was a single piece of fabric - that was cut to 18.5" x 14".


4.) Now depending on your machine size, your final measurements for the front of your cover will vary, but I will show you my layout for your reference. The measurements listed include a 1/4" seam allowance and were pieced in alphabetical order.


5.) Once the front is pieced, you will need to sew the front and back of the top together (see picture below for reference.) Now you have a completed top piece that should measure 27.5" x 18.5"


6.) Before I completed the cover I added just a little bit more embroidery on the cover as seen below.


7.) Now we will need to prepare our ties for the sides - cut (4) lengths of ribbon 20" long. You will pin these 4" up from each corner.


8.) Now place the two fabric pieces (inside and outside cover) right sides together, lining up the corners, and pin every couple of inches. **Be sure that your ribbon pieces are sandwiched between the two layers**.


9.) With a 1/4 seam allowance, sew along the perimeter of the cover.***Leave a 3-4" gap to turn it right side out*** Clip corners and turn.

10.) Give it a nice hot press and top stitch around the perimeter. Enjoy and pursue happiness!


If you have any questions or you spot an error (ack!), please feel free to email me at allthingsbelle@hotmail.com

I would love to see if you make one!

Thursday, June 21, 2012

Peek at the Sewing Machine Cover Tutorial


Tutorial & embroidery pattern coming this week!

Friday, June 15, 2012

Father's Day Printable - Mad Libs Card

Today the girls & I had so much playing with some friends that we haven't seen in awhile. One of my mommy friends mentioned a really fun Father's Day card that she was creating with her sons. The card had a number of spots for the kiddo to guess facts about their Daddy. That sounded like so much fun - kids truly do say the funniest things. I kept thinking about it and wondering what craziness Kiddo would come up with, so I decided to create a Mad Libs card and thought ya'll might like to do it too.

Here is a jpeg preview and you can download a PDF here. Have fun! Would love to hear what silly things you hear from the ankle biters..


Wednesday, March 28, 2012

Fun Easter Projects From 2011

I ended up not being ready to quilt again last night. No, I'm not afraid of my machine - the swelling and pain was just a little too much to try to work around. In the meantime, I am presenting my Easter project tutorials & freebies from last year. I did a ton! Apparently Easter is great inspiration for me!

Hope you enjoy! Many of these projects are on my Tutorial page for future reference.


(A great projects for kids!)


Monday, September 12, 2011

Paper Pieced Snack Mat

I made this adorable little snack mat for Kiddo.
Sorry I don't have a picture after I bound it - she was eager to use it..
in fact it already has a sour cream stain..

Want the pattern?
Come visit Craizee Corners today - I'm guesting posting!

Thursday, September 1, 2011

The Giving Tree

Do you love my little tree design? Did you know you can get the pattern for free? Did you know it's over at Quilting Gallery?

Would love to see if you make one!

Did you know I have a Flickr group for pictures of your projects using my patterns? Check it out!

Sunday, June 5, 2011

Modern Flag - Mug Rug Freebie Pattern

To kick off my pattern debut on Etsy, I'm offering a free pattern for this mug rug. This is a great introduction to paper piecing. Please only use this pattern for personal or charitable use. Also, it would mean so much to me if you would follow my blog if you like my freebies!

Let me know if you have any questions about paper piecing! I'm soo addicted. Designing these patterns is the perfect combination of creativity and logic. I hope you love it too!
If you love the mug rug, but don't want to make it - I'm selling this one in my Etsy store here. It will probably be the only one of this style I make.. Just too many ideas and not enough time..

First Pattern For Sale & Free Tutorial

I'm going to be listing the Patriotic Pennants - paper pieced pattern is for sale . I'm very excited to be starting this new adventure. I have so many ideas and lots of designs to share. If you ever have any questions or design suggestions, please let me know!

Prim Patriotic Banner
You will need
- an odd number of completed paper pieced pennants from the pattern
- a couple yards of 2" wide coordinating ribbon or fabric
- burlap scraps larger than your completed pennants

1.) If you have not already done so, carefully remove the paper
foundation from the back of the pennants.

2.) Trim pennants down to exact size -
you will not need the 1/4" seam allowance for this project.

3.) Pin a pennant on to a piece of scrap burlap -
make sure you have at least 1/2" border of burlap on all sides.

4.) Sew pennant to burlap, stitching with 1/4" seam allowance.

5.) Trim burlap giving the pennant about 1/2" border.

6.) You can either run your ribbon/fabric string
through your ruffler foot at level 12
or run a long basting stitch down the center and hand gather.

7.) Arrange pennants on ruffled ribbon/fabric and pin in place.
Stitch in place.

That's it! Super easy and such a great prim touch for the holidays.
Have questions?
Let me know!

Linking up to:

Wednesday, May 25, 2011

We Remember Moments


When I first started working on this printable today, it had a different meaning. On Facebook a friend of mine mentioned her unhappiness with her pregnant size. I immediately wanted to comment something to effect of that she should enjoy it because as soon as the baby was born, she would miss the feeling. But then I remembered how I would have felt if someone had told me that during any of my pregnancies.

Before I had kids I cried inside each time I saw a pregnant woman. I desperately wanted to have a baby. I wanted to have that baby bump. I wanted to feel the secret kicks and have inexplicable cravings in the middle of the night. It took me years to get pregnant with Isabelle. I remember the feeling of elation as soon as I saw that pink plus sign. And then the pregnancy got complicated. Honestly, the reality of my pregnancies were not easy. I was always very sick, on daily injections for blood clotting issues, and felt guilty about not loving my pregnancy. But, if you asked me how I remember my pregnancies I would tell you about how both girls kicked like crazy when they heard Thomas talk, about my deep love for hot & sour soup, and the maternity clothes I sewed. We remember moments.

The first quote I typed was, "Real Women Have Curves". The point being that having a round pregnant belly is a beautiful expression of being a woman. It took me about a second to look at my graphic and recoil. I instantly remembered the pangs of infertility and my pregnancy loss before Juliette. No, being a "real" woman was more than carrying a child. And so I searched for something else.

As I pondered what would be an appropriate quote and I found this "moments" one, I was still a bit tender from remembering my pregnancy loss almost 2 years ago. And it occurred to me that even though I suffered a loss, I still have that moment when I first found out I was pregnant. I was in my brother's home in Tucson. I was ecstatic. I was over the moon. I called Thomas at work to tell him Isabelle was going to be a big sister. And it didn't work out, but I still have those moments in my heart.

I hope this printable touches you.
Whether it's remembering
the amazing pregnancy journey you're on,
the hard fought pregnancy you had,
the tearful one you loss,
or the one you never had.

We remember moments..

Friday, May 20, 2011

Mother's Day Dresses - Freebie Baby Pattern


My friend Viv, is a fabulous photographer! I'm blessed to have met her. She has taken many photo shoots of the important times in my life - maternity, Julie's birth, and more. This year she took our Mother's Day pictures. My mom & I try to have pictures taken each year ever since I had Isabelle. It is a wonderful way to watch our family grow. If you live in Utah, I definitely recommend checking Viv out to do your next photo shoot!

This may not surprise some readers, but I made all the dresses in the picture. Isabelle's dress is from my pattern review of DMK (p.s. the DMK winners will be posted this Sunday!)

My dress is from Elegant Musing's Swing Dress Sew-A-Long. Never in a million years would I have attempted to make a garment from a vintage pattern on my own before this. Casey is an incredibly talented seamstress and she did a fabulous job of walking us through each step. The wonderful thing about a Sew-A-Long on a blog, is you can join anytime! If you have interest in sewing a vintage dress, I highly recommend you check this out. I love my dress. I learned soo much. I made a muslin to learn more about where and how to alter a pattern for your body. I'm very short waisted and most patterns don't fit right out of envelope for me. I have lost my fear of vintage and am now looking to tackle a 1940's bathing suit. Thank you Casey!

And last but certainly not least, I made Julie's romper.. from scratch,no pattern. My readers know that is uncharted waters for me. Garment construction has been a bit of a mystery to me, but I'm trying and learning. This is a super easy and cute item to make. I originally had planned on buying some fabric from Ruffle Fabric, but when I went back to purchase it, that style was sold out (so buy it when you see it!) They were at the Quilt Market and I bought a ton of material!!

Okay so on to my easy peasy tutorial. You will need to find a ready made romper in your closet. I choose the Winnie the Pooh one and tucked down the top at about the chest.
Lay out your fabric folded underneath the romper. Draw an outline 1-2" larger than the romper. My fabric had zero stretch so I made it a bit bigger. If you are working with a stretchy fabric you can give yourself less of a seam allowance.

Cut out your fabric pieces. Lay your cut lace across the top. You can put your lace through your ruffler or gather it by hand if you want a more flouncy appearance. I didn't buy enough so I just sewed it straight on. Pin your lace in several places on front romper piece so it doesn't shift while you're sewing. I gave myself about 1" inch fudge room at the top and legs - you'll need this to make the elastic casing.

Sew your lace strips down. I used a clear filament thread to reduce the visibility of the stitch line. With right sides together, sew the sides of the romper together with 1/2" seam allowance (I serged mine to make it quick and neat. Then sew the inner legs and crotch.

Before you take the time to make the elastic casing, try it on your kiddo. I found my legs were WAY longer than I wanted and cut off a good 2". Once you're happy with the fit, it's time to finish it up.

At the top you will fold the fabric in 1/2" and 1/2" again - to create the elastic casing. Sew along very close to the fold and leave about a 2" opening. Measure your kiddo's chest and cut your elastic that length - I used 1/4" wide elastic. Thread it through the casing and stitch the elastic ends together. Hand sew your opening closed.

Now do the same for your leg openings. And that's it!

I know I went super duper fast (the kiddos are being naughty monkeys this week!), so if you need clarification or more specific measurements please let me know..

Here is my angel Julie..
She's crying because her romper is so gorgeous and it took so little time!


Thursday, May 12, 2011

You Can DO It!


Because it's true.
Because Eleanor Roosevelt said it.

It would be perfect printed & framed where you need motivation the most.

Friday, May 6, 2011

Friday Freebie - Mom Banner

Here is a sweet little banner you can print out and post around the house. I originally designed it to be a coloring page for little ones - so feel free to let the kiddos color in the letters & heart!

I added tabs to the top so you can fold them over and tape down to the ribbon.
Here is mine! I strung it on some fun Martha Stewart bakers twine. This is our gate to our bottom floor where my parent's guest room is - I thought it would be a fun way to welcome my mom.


Do you want a different color?
Leave me a comment and I'll post some color options this evening!

If you like my downloads, could you *follow* me?
That way I know ya'll like them
and you'll know when I post the next one!

Wednesday, May 4, 2011

Another Cinco De Mayo *Freebie*

Are you ready for Cinco De Mayo? We are going to be having margaritas and some delish tacos!

You can some fiesta to your day real quick too! Come download this mini subway art. You can print it out or maybe cut out on some vinyl. Enjoy!

Did you miss my Cinco De Mayo *freebie* banner? It's over here...

Friday, April 29, 2011

Freebie Friday - Cinco De Mayo Banner & Free Ad Space


Cinco De Mayo is just around the corner! I know it may not be a huge holiday here in the U.S., but my husband's family is from Mexico... and well we just like to find a reason to party! And now you can add a little fiesta to your week with this adorable & free Cinco De Mayo printable banner.

I had soo much trouble finding the right angle for the pictures. They just don't do it justice. The banner is a ton of fun and won't take you much time. I just cut out the circles, adhered them down to a large length of brown ribbon, and hung it up in our kitchen.

Here are a few more pictures...
I would love it if joined you my blog if you decide to print it - that way I know you liked it and want more! Also it will help you stay connected to me and know about the next best freebie!

Now go have a fabulous fiesta and don't forget the margaritas...

***

Are you interested in some *free* advertising? Each month I will rotate 6 ads on my blog. It is a first come, first serve basis. Please leave a comment with your email that you are interested.

This awesome deal will go on till my blog reaches 300 followers...

***

Have a fabulous Friday!

Linking Up To:


Friday, April 22, 2011

Freebie Friday - Mother's Day Printable

I wonder if this phrase ever worked for a mother...

For Freebie Friday, I hope you enjoy this adorable printable. I'm planning on printing & framing mine, and displaying it on my kitchen hutch.

Now if only I could get my toddler to understand what it means...

Linking up to:

Wednesday, March 23, 2011

Iron Craft 12

The challenge this week on Iron Craft was to create something
inspired by "lucky".
Since St. Patrick's Day had passed, I tried to think outside the box.
And lead me to a bigger box, Julie's bedroom!

Her room is over the top cute cowgirl!
Shades of pink and brown abound, with lots of Riley Blake fabric..
I decided that I would break out the Pazzle again
(it's actually starting to make itself at home on one of my craft tables)
and cut out some horseshoes.


I used Silhouette's brown velveteen vinyl.
So soft and yummy...but one teeny complaint..
It doesn't adhere as nice as the other vinyls.
Luckily the horseshoes around the clock have stuck!

There ya go partner - a little luck, country style!

Want to make it for your half pint?
Here are some FREE downloads for ya
(personal use of course)


Serenity Now Crafty Cutter Party

Thursday, March 10, 2011

Easter Subway Art - Freebie Coming!

My Pazzle has been dusty.
Since I closed my bakery, I haven't had a need to use it much.
And I've been eying my Mum's Silhouette.
I love the Silhouette graphics and have been bitter I can't convert & use them.
I know I could spend more time figuring out my Pazzle,
but when the girls give me 20 minutes here and there,
it is hard to imagine studying anything..

This past week, my Mum & I visited
a local craft store and found a fabulous idea!
They had a DIY St. Patrick's Day Subway Vinyl Art.
It was fabulous!
All you had to do was paint a wood square
and rub-on the vinyl..
voila, instant holiday decor!

Alas, there was no Easter one
:(
The impatient DIY'ers we are..I decided to make our own.
I love Subway art, but have never made one.

I broke out my dusty Pazzle and decided to take some time to
rekindle the love..
I created the image in Photoshop.
Simple enough - just lay out words in different fonts & sizes.
Since this was my first time, I laid out the words too far apart.
But even this had an easy fix!

I imported the JPEG into my Pazzle software.
It cut out my vinyl with ease!
I weeded the excess and covered it with the transfer tape.
I cut out the individual words so I could place them closer together.

Instead of transferring to a wood piece, I painted a square canvas instead.
The vinyl goes on just as easy and I like the texture of canvas better.

As you can see from my picture,
when I placed the words closer together I created a lot of negative space.
I'm going to measure those areas and cut out more words to fill in.

Once I have it completed, I will upload my JPEG for you to use!
It won't look exactly like mine,
but it will be a great start to a pretty easy and lovely Easter decoration.
I should have the freebie up by Sunday night -
so come on back!

I will have a less Religious, more Bunny focused piece
in the shop later this week as well..


Bubbly Nature

.

Related Posts Plugin for WordPress, Blogger...